When I started making my own Blinkie's, I searched high and low for tutorials on how to make them. There really aren't any specific tuts on "Blinkie's" as we (in the digi-scrap world) know them. Meaning the 150 x 50 pixel blinking box, usually containing the words "fan of" or "I design for" and such. So, I decided that I would put together a few tutorials on the basics of blinkie making using Adobe Photoshop and ImageReady.
Not familiar with these, you can read a little about the Photoshop family of programs at - Adobe.com
I first learned how to make them using Photoshop 6.0. It was a very old version of Photoshop, and I wasn't able to get very far. Here is my very first blinkie: 
You can see here that it wasn't very smooth, and the transitions were awful. Then, I received a copy of Photoshop 7.0: 
This blinkie has much better transitions and it flows much smother. One of my favorite transitions of this blinkie is the Fade and that is the first tutorial that I will be putting together for you. While I'm at it, I'll explain some Photoshop basics too.
Part I - Blinkie Tutorial
Getting Started - Photoshop Basics

Here is the final .gif file that will be made using this tutorial. As you can see, very basic. But, an essential skill for mastering the making of a blinkie.
Step One: Open a new file

Open Photoshop
Go to File>New and choose the settings shown above.
I always start with a transparent background for all of my work, but you can start however is more comfortable for you.
Click OK and your screen should look a little something like this:

I've pointed out some of the main elements of Photoshop that we'll be using, just in case you're not totally familiar with the program. Also, take note that in my previews I am using a file size of 300 x 100 so it is easier for you to see.
Step 2 - Fill your workspace with color
 This is a pretty easy step. First, click on the paint bucket Icon. I have outlined this button on the tools pallet to the left with Red.
Next Click on the foreground color picker. Here I have outlined it in blue. (Specifically the Foreground is the pink box and your background color is the white box.) If you're still a little confused you can move your mouse to the button in question and let it sit there for a second, a box will pop up and tell you what that button is.
When you click on the color box you should see a window like this:

For this tutorial, I am using a Pink color #F4DBF9 as the foreground. If you would like to do the same you can enter those 6 digits into the box that I have highlighted Blue. If not go ahead and choose the color you want to use and click okay. (click a color on the color spectrum to the left of the large box, then it will show up at the right. From there you can choose the specific shade of that color)
Here's a useful website that gives you the 6 digit codes for different colors: http://html-color-codes.com/
Okay, you have your paint bucket ready to go with the correct color in hand. Now just click in your work space and your 150x50 space should be filled with the color you picked out.

Step 3 - Add your text
 Click on the text tool, I have outlined it in Red for you. At the top of the screen you'll see the area where you can choose your text and font options.
![]()
Here, I have chosen the "Adorable" font at regular size/style, 10pt and smooth. I've also chosen the 'center' alignment. Lastly, make sure to set your font color. Reminder: I'm working with a larger workspace, 300x100, so you may need to adjust your font pt size to something smaller then 10.
![]()
I've outlined this option in red. Click and choose your color just like in the previous step.
Once you have chosen your font and font color, click the center of your work space and start typing.

Step four - moving your project to ImageReady
That's it for the Photoshop part of this tutorial. Click the button at the bottom of the tools pallet. It is the Quick Exchange button between Photoshop and Image Ready.
It looks like this: 
Once you push that, Image Ready will open up and automatically load your work space.
Part II - Blinkie Tutorial - ImageReady - Fading Text
Alright, Now... On to ImageReady. Your screen should now look a little something like this:

Let's focus our attension on the Layers Pallet. It's in the bottom right hand corner of the screen. Here's a close up:

This box shows you each layer of your work space. For this project there should only be two (2) layers. The first being the text layer. (highlighted with the 'T' icon) Then there is your background layer (layer 1).
Now, lets have a look at the Animation pallet. This one is usually located in the bottom left and looks like this:
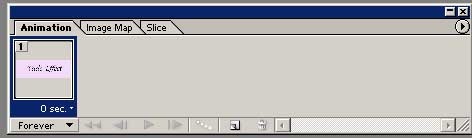
This works much like a slide show. Right now there is only One "slide". ImageReady refers to these as Frames.
ImageReady is open and you're now familiar with the main components that we'll be using. On to...
Step One - Adding Frames
You want to set yourself up with the First and Last frame of your animation.
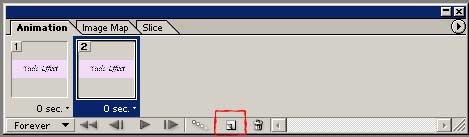
Start off by pushing the 'duplicate frames' button which I have highlighted above. You should now see two of the same frame. Make sure that your new frame is highlighted before you move on to step two.
Step two - preparing your layers
Take a look again at your layers pallet. Notice the symbols to the left of your layer titles? They look like a little eye: ![]() Go ahead and give those a click and watch what they do. When the eye is removed you should no longer be able to see that layer in your workspace. Go ahead and click the eye on your text layer.
Go ahead and give those a click and watch what they do. When the eye is removed you should no longer be able to see that layer in your workspace. Go ahead and click the eye on your text layer.

This is what your layers pallet should look like now. Be sure that you can still see your background image.
Step Three - Making your animation
Take a look at your animation pallet again. It should look like this:

You have your first and last frames of your animation ready. Now, click your first frame and make sure it's highlighted. Then push the 'tween' button at the bottom of the animation pallet. It looks like this: ![]()
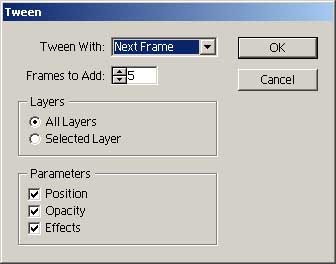
This is the window that should pop up once you push the tween button.
Note: make sure that your first frame is highlighted. Plus, you can change the amount of frames that are used. Choose more for a slower fade or less to fade faster.
Click Ok.
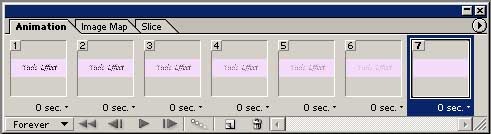
Your animation pallet should now look like this. Your two original frames along with the 5 extra frames that were added. Go ahead and push the play button to watch your newly made fading text.

Step four - Saving your blinkie
go to file>save optimized as...
This will automatically save it as a .gif file. Just name it and click ok. From there be sure to upload it into your favorite photo hosting site (flickr, photobucket), grab the code and post your newly made fading text blinkie anywhere you want.
3 comments:
so now I will have to try and make my own... REALLY GREAT tut!!!! I will post about it on my blog :)
hey! i can't seem to find my "image ready" button in PSE6? Do you happen to know if I even have it?
Thank you for this lovley tut
Post a Comment