If you haven't noticed already, I've changed the look of my blog to this wonderful blue. Want to know where I got it? I made it from the "It's Ladies Night" kit by Ginger at GingerScraps!! Head on over there and grab this fab kit inspired by the wonderful Sex and the City!
Lately I've had a lot of requests asking for help on getting blog layouts set up. For some reason, the directions that are usually given with the layouts people download are not all that great so this is my attempt at giving a little help for those that aren't that familiar with blogger, html or CSS. This is just a quick little how to on adding a background and maybe later I'll get into some more in depth stuff. First, I want to point you to a great blogger resource at http://tips-for-new-bloggers.blogspot.com there is a lot of great information on fixin' up your blog. However, they get a little technical sometimes so if you have any questions about what they are talking about just leave me a note.
Now, on to the tutorial.
First lets start off with logging into Blogger. Once you're there get over to your dashboard. (Usually when you log in it'll take you straight to it, however if you're looking at your blog you can click on 'customize' in the top right corner, then click on dashboard.)
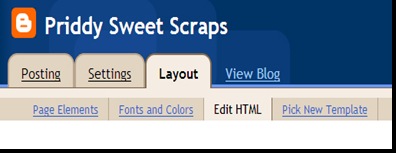
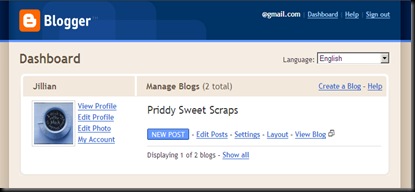 Next, click on where it says Layout. This should bring you to a page with the following menu.
Click on where it says Edit HTML. Once you're there, the first thing you want to do is make a back up of the template you already have. That way if you don't like the changes that you've made you will have something to go back to.
Click where it says "Download Full Template" and save someplace that you can find it later if you need it.
One you've saved your old blog, scroll down a little further to the edit box:
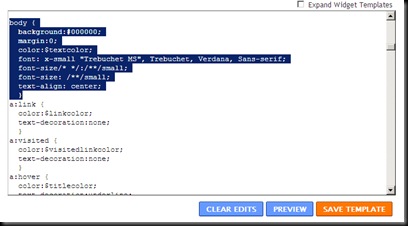
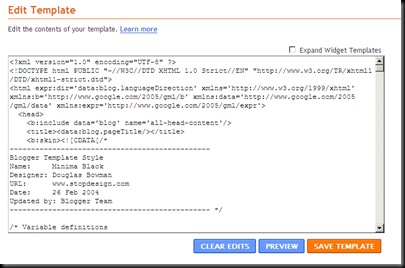 See at the bottom of the box where it says variable definitions? What you're going to do is scroll down just past all those lines that say variable until you find the line that says "Body"
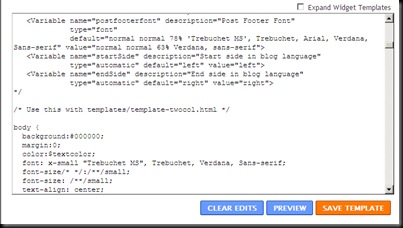
Alright, see there in the middle of the box (above) there's the line that says "body" and then I've highlighted the code that we'll be working with:
Note: If you want to learn more about the syntax of the HTML/CSS coding there's a great website HERE that you can check out.
I'll go through a few CSS/HTML code basics just so you know what I'm talking about.
The basic CSS is a combination of a Selector or tag, then a property and finally a value of that property. In this tutorial we will be working with the Selector/tag: BODY, the property: BACKGROUND and the values that go along with those. Those will include centering the image, setting the position and scroll actions. More about those in a bit.
Right now we are going to take a look at the first line with the BACKGROUND property;
background: #000000;
All this line does is set the color of your blog background (the color that shows up UNDER the image you'll be adding) using the 6 digit HTML HEX CODE as the value for this line of CSS code. I usually try to set this to something that matches the image that I'll be adding, but that is not necessary. It's possible that you may not even have this line in your code, DON'T WORRY, it's not important. (#000000 = black)
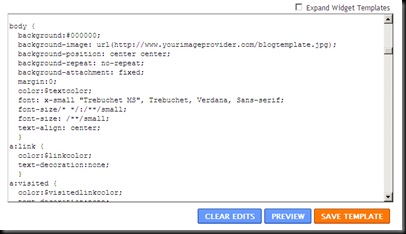
The next thing we are going to do is add 4 lines to the Body tag. They will look like this: (Copy and Paste)
background-image: url(http://www.link.com);
background-position: center center;
background-repeat: no-repeat;
background-attachment: fixed;
Here's a picture of what the code looks like with these lines added:
Here's a little breakdown of each line for you plus other variables that you can experiment with if you like. (take advantage of the PREVIEW button)
First is the background-image line. This is where you will add the link for your new template image. Your design should be at least 1024 pixels wide. This way you can be sure that it will fit properly on most computer screens. Unfortunately, everyone's is different so you have to take that into consideration. Something that looks perfect for you may be completely off for someone else. Make sure you insert your web address between the (brackets).
background-image: url(http://www.photobucket.com);
The next line is background-position. This tells blogger to align your image where you want it. Again for proper viewing purposes, you want to be centered, that way no matter what size the screen, it'll line up with your blog text properly. So, for this line you'll want to set the values at center center. The reason for two is so it centers your image vertically AND horizontally.
background-position: center center;
Other values include:
top left
top center
top right
center left
center right
bottom left
bottom center
bottom right
Alright, on to the 3rd value: background-attachment. There are only two values for this property. Scroll and fixed. On my blog, I have this value set to fixed. Unless your background image repeats seamlessly, I suggest keeping it fixed. (when you scroll you see the text move over the image and the background stays in place) Go ahead and experiment with both values and see what works best for your blog.
The last line that we'll be working with is the background-repeat property. There are 4 different values for this property:
repeat - tiles your background image horizontally and vertically
repeat-x - tiles your background horizontally only
repeat-y - tiles your background vertically only
no-repeat - does not repeat your background image
Feel free to experiment with these values as well. But you'll probably find that the no-repeat works best with your fixed attachment.
background-repeat: no-repeat;
That's it! Preview to make sure it's working properly and click SAVE TEMPLATE!
3 comments:
Thank you so much for this tutorial Jillian!!! I've been wanting to learn how to do this forever and couldn't find where. Bless your heart!
I don't suppose you could let me in on how to add those cool blinkies onto my site too??? :)
Hugs,
Rhon
I am in your cafemom group. could you please explain this code to me? I have tried everything you posted, and it doesn't change my blog at all. I want the outside pretty not just one solid color, and I cannot figure out how. I have my background saved in photobucket, just won't work as you posted. Thanks
Thanks so much for this. I've looked ever where for a tutorial. This was the easiest and best explained out of them all.
Post a Comment